
If you can read this then thank a teacher. It's that time of year to appreciate a teacher or teachers. I have retired from the teaching profession in the school system. I'm still working on Sunday mornings teaching an Adult Sunday School class at my church. Today, I want to teach some of you how to do a "lever card". If you research fancy fold cards, this is one that is listed. Let's get started: If you would like to follow go to http://www.splitcoaststampers.com/resources/tutorials/levercard
Supplies:
•Two 5 1/2" x 8 1/2" pieces of cardstock
• Paper Cutter
• Scoring tool
• Adhesive
• Patterned paper, stamps, and dies to decorate completed card
 | ||
| Step 1 Score the first piece of cardstock at 4 1/4" and fold in half. This will be the card itself. On the side that is the front, cut out a square window, 1” from all 4 sides. | Note: The completed card measure 4 1/4" x 5 1/2" |
 | ||
| Step 2 Score the second piece of cardstock at 4 1/4" and 6 3/8”. Go in 2 1/8” from the left edge and score down to 1” from the top and up to 1” from the bottom. |
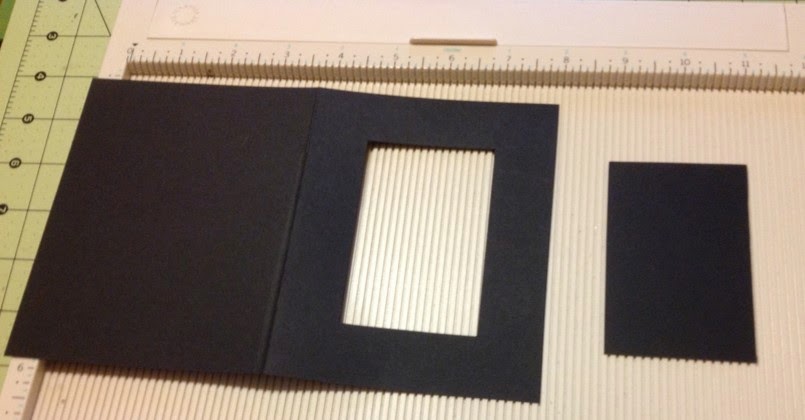 |
| Step 3 Measure 1" around on all 4 sides and cut out window. |
 | ||||
| Step 4 To cut the “lever” that will fit through the card front “window”, go in 1” from the left edge and cut a slit that starts 1” from the top and goes down to 1” from the bottom.Cut from the top and bottom ends of that slit over to the 2 1/8” score line. This produces the “lever” that will fit through the front window. |
 | |||
| Fold on all score lines. Folds should be valley/mountain/valley folded. Add adhesive to the “backside” of the left and right panels of the cardstock you just scored and glue it inside the card. The “lever” tucks inside of the front “window”. If this is a tight fit, trim a sliver off the top and bottom of the lever so that it will move freely through the window. Glue this section to the card front section. Cut a 4” x 5 1/4” piece of patterned paper for the front of the card. Cut in 7/8” from all 4 sides to make the decorative layer for the front of the card. For the inside of the card, cut 3 strips of patterned paper 1 7/8” x 5 1/4” tall. Cut a fourth piece 3 1/8” wide by 5 1/4” tall. Adhere two of the 1 7/8” pieces to cover the two right panels inside the card. The third will be used to cover the left side of panel after you shape it. On the remaining 1 7/8” x 5 1/4” piece, cut in 1” from the RIGHT side, 7/8” from the top and 7/8” from the bottom. Make a vertical cut that connects these two cuts, so that the remaining piece of patterned paper looks like a “C”. Adhere this to the LEFT panel of the inside of the card. | On the 3 1/8” x 5 1/4” patterned paper, cut in 1 1/8” from the LEFT side, 7/8” from the top and 7/8” from the bottom. Cut down from the top and up from the bottom to meet these two cuts and remove those two small squares of paper. This creates a shape that will cover the “lever” part of the card. |
 |
| Lever Card Front...Teacher Appreciation #1 Decorate the front and inside of the card with die-cuts, images, and sentiments as desired. |
 |
| Inside of Card |
 |
| Lever Card....Teacher Appreciation #2 Card Front |
 |
| Inside of Card #2 |
 |
| This card follows the sketch from www.freshlymadesketches.blogspot.com #184 . I posted this because it goes with the other Teacher Appreciation Cards. This is the outside view. |
 |
| This is part of the inside view with the sentiment. |
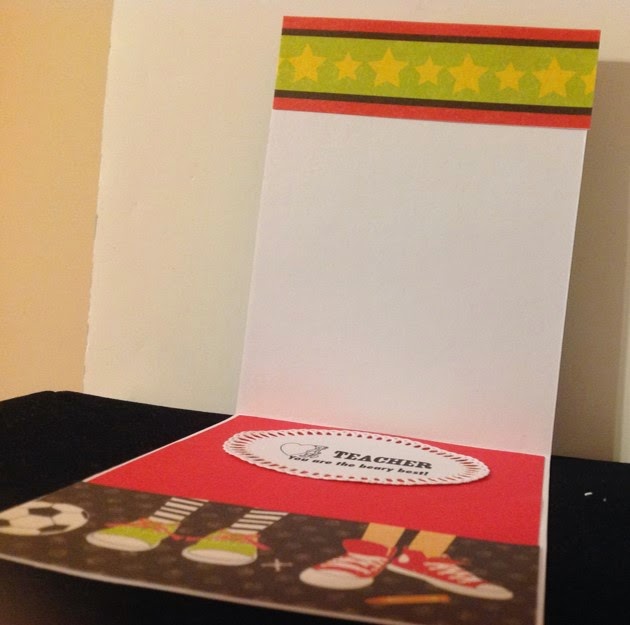 |
| This is the full inside of the card.
I'm sending these to my granddaughter so that she can give them to her teachers.
Appreciate a teacher or teachers next week when we celebrate Teacher Appreciation Week. It could be a public or private school teacher or someone at your church.
Thanks for viewing with me today. I love those comments. Keep them coming!
Sending you a hug and LOVE,
Lois
|
2 comments:
Love your cards, nicely embellished; I think I will try your instructions, thanks for sharing!
WOW! Thank you ... This is awesome
Post a Comment